Showing posts with label master bedroom closet. Show all posts

Thursday, April 8, 2010

Dresser Drawer Overhaul

I recently did a dresser drawer overhaul in our master bedroom. From start to finish (6 drawers), it took about 1 1/2 hours. I have before and after photos for you to see. I was frustrated with not being able to find what I wanted in our drawers. Moreover, my 15 month old son was having too much fun taking everything out of the drawers, which made my attempts at keeping the drawers neat worse.

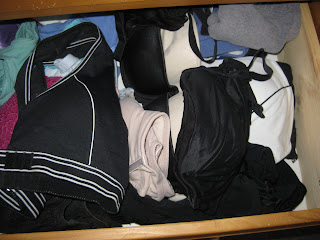
Here are some before pics:

Sock Drawer (also contained tights, hose, slips, etc.)

Panty drawer, all types mixed up


Other side of pantry drawer, again all types mixed up

bra drawer, messy

other side of bra drawer, couldn't find straps to special occasion bras
In the dresser four drawers were for me, and two drawers for my husband. My drawers consisted of underclothing, socks, hose/tights, and bathing suits. My husband's drawers had socks and underwear in them.
These are the steps I took to organize the drawers.
  1. Completely empty a drawer, one at a time.
  2. Vacuum out the drawer with the hose of the vacuum.
  3. Go through each item creating a donate pile, trash pile, and keep pile.
  4. Items that were in the kept pile were then folded neatly and stacked into "like" piles (i.e. exercise bras, cotton panties, thongs, special panties/bras, maternity bras, nursing tanks, strapless bras, etc.).
  5. Place neatly stacked piles back into the drawer. Place less-used items in the back of the drawer and more-used items in the front of the drawer. *Use drawer separaters if you choose (more on that below).
  • I took out all my maternity bras and nursing tanks out of the drawers and put them into a large storage container to be stored in the basement. They were taking up precious space!
  • I moved my sports bras and slips to the closet.
  • Some of my special occasion bras have straps, so I put them into a zip-top bag so that I could find the straps when needed.
  • Socks were inspected for holes, loss of elasticity, etc. and tossed into the trash.
  • Pantyhose, tights, and thigh highs were inspected for holes and runs. The keepers were then put into individual zip-top bags to prevent snagging.

*Drawer dividers are a great way to keep piles in piles and looking neat. I researched several sites to order some of these. Unfortunately, I didn't find what I was looking for and need to go to a organizing store in a larger city to find what I am looking for. I tried to use sturdy pieces of cardboard (which you will see in some of the photos), but then didn't like these because they made my clothes smell like cardboard...not pleasant!*

After pics of the drawers:
half of my husband's underwear drawer


my sock drawer, each pair folded into each other, color cordinated, single layer

panty drawer, neat stacks in similar types


half of bra drawer, right side is special occasion bras (i.e. strapless, convertible, bustier)


other half of bra drawer, bras folded into cups, colour-cordinated
There are two drawers not pictures, my husband's sock drawer and my bathing suit drawer. I hope this gives you some ideas on how to organize your drawers and underclothing! If you have additional ideas, please feel free to post a comment. I can find anything now quickly and efficiently and save precious minutes in the morning getting ready!


Tuesday, February 23, 2010

Master Bedroom Closet Makeover--Part 2

After MUCH research of different closet systems, my husband and I decided to put a hold on this closet remodel project. It is very expensive and we weren't sure what exactly we wanted. We will attempt to do this again come this winter. So now I organized the closet with what items we have on hand now. I bought nothing new.


These are the steps I have taken so far:


Organizing a closet this size with this much in it, was going to be a multi-step project. The first step was to take before pics and make a plan. After the before pictures were taken, my next step was to go through each item, getting rid of clothes and shoes that my husband and I no longer wear. I made three piles: sell, donate, and throw away. For me, this took about 1-2 hours.


Next I started with the top shelf. I reorganized my husband's sweaters, sweatshirts, and t-shirts. I made two folded stacks of sweaters, two folded stacks of sweaters, and several stacks of like-color t-shirts. I labeled each stack by sticking a label below on the shelf marking what the pile had in it. This was mainly so my husband could keep things organized as well. He has about 3/4 of the top shelf for his items. The other 1/4 of the top shelf has my sweaters and t-shirts. I have my sweaters folded in stacks of hooded sweaters, turtlenecks, warmer sweaters, light sweaters, etc. I have my stacks labeled as well the same as my husband's (see pictures). For the summer my sweaters are the top shelf, and in winter I put them where my shorts and summer bottoms are kept.
After the entire top wrap around shelf was neat and organized, I went to the shelves in our closet. The top shelf had my husband's jeans and khakis on them. I decided to hang my husband's pants and khakis because he would make a mess of the stacks finding the pair he wanted. I used that top shelf now for my husband's work clothes (pants and t-shirts), again labeled.
The next two shelves had my sweaters on them. Now they have been moved for the summer to the wrap around shelf in the closet. The one shelf has my work-out shorts, capris, and long pants on them, labeled. The next shelf down has my shorts and summer cardigans, labeled. The bottom shelf has my jeans and capri jeans on it. I have not organized this shelf yet, and it will be talked about in part three of the closet makeover.

I also used my husband's tie hanger for my scarves. My husband no longer has a job that requires him to wear ties, and MANY were outdated. The ones that we kept, I hung on a regular hanger. The belts that we kept are hung on a regular hanger, one for my husband's belts and two for mine.

Wrap-around shelf, (left to right) my husband's t-shirts color-coordinated, my t-shirts, my sweaters. Please note that each stack is labeled.

More detailed picture of my sweaters and labels.

My hanger with scarves on it, top shelf with work-out clothes and next shelf with shorts and cardigans on it.

Top shelf, my husband's work pants, t-shirts, and caps. Next shelf my work-out shorts, capris, leggings, and long pants.

Wrap-around shelf, my husband's sweatshirts, lounge pants, sweaters, and sweatshirts. Please note labels. Also, hanging are my husband's khakis and jeans.
*************************************************************************

What I have done so far took me approximately 3-4 hours. Please see pictures above for details on my progress. I am now working on the rest of things, which will probably take me two more posts to finish.
By tackling small sections, it helped me to not get over-whelmed by the amount of work it is taking to overhaul our closet. Moreover, you can start and stop more easily and work on this project over several weeks, if needed.
If you feel yourself getting overwhelmed, TAKE A BREAK!!!
When you have finished your closet project, you will be much less stressed and feel better that you are organized and can find things easily!


Thursday, January 28, 2010

Walk-In Closet Makeover--Part 1


As an organizer, I am embarrassed to say that the walk-in closet in our master bedroom has literally become a disaster! I have been wanting to install a custom walk-in closet system since we moved into our house. So for months now, I have been procrastinating and in the process of my procrastination, I have let our closet become the mess that it is! As for most of the "stuff" on the floor, it is due to my one-year-old son taking all the folded clothes off the shelves and playing with them!

There are SO many options out there for closet system makeovers from a few hundred dollars to several thousand dollars! I want something high quality, but I want a great deal! This makes a perfect winter project for me to complete! It has come to the point that I "just have to make a decision" and stick with it!

Saturday, January 16, 2010

Laundry Out of Control?

One night my friends and I were talking (I really mean griping!) about our household tasks. One task that we all had difficulty with was how hard it is to keep up with laundry...especially with children! We felt that is was too time consuming and never seemed to get put away once it was folded.

I am probably the odd ball here because laundry is one of my favorite chores! However, I don't enjoy all aspects of it. The part I don't like about laundry is ironing and putting away the clothes. I have come up with some suggestions to make it less time consuming, less of a headache to deal with, and less work for you!

1. Get LOTS of Laundry Baskets!
Go to the dollar store and stock up on laundry baskets. Simple plastic ones will do the trick, and make sure that you AND YOUR FAMILY MEMBERS can carry them easily. I typically do not like the fancy wicker ones because they are not easy to carry and tend to harbor ordors!

2. Divide and Conquer!
I have three baskets in the master bedroom closet (one for whites, colors, and jeans/heavy duty). I have one basket in each of the children's bedrooms. I have one basket in each bathroom where bathing takes place, and one basket in the laundry room.

3. Laundry Day
Pick a day(s) of the week that you will be doing laundry. Since the master bedroom will have three baskets (one for whites, colors, and jeans/heavy duty), TEACH your family members to sort the contents of their baskets from their bedrooms into your baskets. As for the baskets in the bathrooms, have your children alternate weeks and do the same thing with the contents of those baskets as they did with their laundry baskets. The laundry basket in the laundry room is for kitchen towels and other misc. items.

***TIP--by giving your family members and/or children some of this responsibility is equals less work for you and teaches them a valuable lesson about contributing to the family!

Also, please note that when teaching your family try not to be too critical or too much of a perfectionist or they are not going to want to participate with helping out!

***IMPORTANT--have a separate basket for delicates, items that need hand-washing, or cannot be put into the dryer! I would do that load myself to ensure that items do not get ruined!!

4. Washing/Drying
Decide on who will be putting laundry into washer and dryer. I for one, am a bit particular about laundry, my husband wouldn't even know how to turn the washer on, so I am the one that does it all. However, you may want to give older children/teenagers this responsibility. Afterall if it is all sorted now and brought to the laundry room/area, the easy part is loading the washer and dryer!

5. Fold and Put Away as a Family
In our house, we fold as a family in front of the TV. If you have children old enough to help fold, teach them how you want clothes and towels folded so you are not refolding items. Have a basket on hand for each person and/or bedroom. Load baskets with items for each bedroom and/or family member. Load one basket with linens to put away. Have members of the family bring their basket back to their bedroom, and again, if old enough put his/her OWN clothes away neatly! You may have to check their work a few times to ensure they are not just tossing things into drawers.

6. Ironing
This is my least favorite task! I typically tackle ironing once or twice a month. I do it in front of the TV usually when the kids are sleeping or napping. If you have teenagers that are capable of doing a good job with this, you could have them do this chore or do a portion of it.

Other Tips!
  • Start loads of laundry at night. Not only will you be saving energy (and money!), you will be one step ahead of the game!
  • Do not let items sit in the dryer. Otherwise, you are creating more work for yourself if they are all wrinkled when you go to iron. If you do put laundry in the dryer at night, fluff the load for a few minutes before folding in the morning.
  • Line drying (again for energy consumption) is something I take advantage of in the summer months! I love the feel of line-dried towels, and the smell of line-dried clothes! This is something that family members can help out with as well!!!
  • Do not put wet or damp items into laundry baskets! That just creates stinky laundry and often the mildew smell is hard to get out of clothes. Moreover, mold can grow on items, which is virtually impossible to get out except by using bleach. Teach children to dry items first by handing them on the tub or towel racks!!
I hope this helps you loathe laundry less! By getting your family involved, you are teaching them responsibility and the value of helping each other out. You will be giving yourself more time to be with your family instead of a bystander doing all the chores while they are having all the fun!!! Even very small children can help out too. Give the appropriate tasks to the appropriate age!
Good luck and happy laundry day!!

Tuesday, January 5, 2010

2010 Resolutions

As the new year is upon us, I am like most people, I have a few New Year's resolutions. The first one is to be more organized! That one might be a surprise to some as I am the one writing about being organized. However, wearing so many "hats" leaves me with little time.

Before becoming a mother, I was "neat freak." Everything always had to be clean, tidy, and organized! When I moved to Canada permanently, I was essentially "moving in" with my husband permanently as well. That meant that my step-son, who was eight years old at the time, stayed with us often. As most eight year olds, they are messy eaters at times! It drove me nuts! I was constantly vacuuming up the crumbs behind him. My in-laws laughed at me and told me to "get used to it." I didn't think it was going to be "that bad" having a baby around. Well, as my baby is approaching one year in a few days, he is the one making a MUCH BIGGER mess that the eight year ever could! I have had to learn to relax a little bit on my squeaky clean regime. Thus, this has taken a tole on my organized home!

One area that has gotten disorderly and is driving me crazy is the closets! Two closets being of particular concern, the master bedroom closet and the baby's room closet. In our master bedroom closet, the stacks of clothes are hardly neat anymore, there are hangers on the floor, laundry piles up quickly, clothes that need to be donated, and I have maternity and post-maternity clothes in a pile in the corner. It has gotten out of control!

The baby's room closet is a mess partly because of him digging in there for toys that I have already put away. I have a habit of finding amazing deals on things, so I have toys that he is still too young for which are piled on the shelf in the closet. Now there is way too much on the shelf! The floor in his closet is covered with books, old and new toys, a baby swing, an exersaucer, and so much more! It is a huge mess! I can't find anything!

A few other areas that are making me nuts are the dresser drawers. Again, my baby is partly to blame for this one! He is in the habit of taking everything out of them and throwing them onto the floor. Need less to say, his dresser drawers are no longer full of perfectly-folded, neat piles of clothing. In the master bedroom, the same problem is happening in our dresser drawers. I must say this one is my fault, probably because I am putting things away in a hurried manner.

So as 2010 is upon us, I will be taking some "before" pics of these areas and some "after" pics when I am finished. I intend on keeping these areas as neat as possible! In my defense, I organized our home when we moved into it a year and a half ago. It has stayed neat and organized up until probably November of 2009. I think part of the disorganization may be due to the holidays and being even more busy than normal! That may be just my excuse, but I am going to stick with it!